Hi to my faithful followers of this blog! This blog has moved to its new location on Square Space. Please click the link below to get to my new website. Thanks!!
Head on over to the blog to make sure you’re subscribed!


05 Sunday Apr 2015
Posted in Before and After
Hi to my faithful followers of this blog! This blog has moved to its new location on Square Space. Please click the link below to get to my new website. Thanks!!
Head on over to the blog to make sure you’re subscribed!

27 Friday Mar 2015
Posted in • Furniture as Art, Before and After, The Creative Process, Tutorial

Hi friends. Two pieces in my Idea Furniture Collection were on display last week at a reception at On The Purple Couch in DC, one of Annie Sloan’s stockists here in the US. What a warm reception I received by the owner, Bahia, and from those who attended. It was a lovely experience. After posting these shots in Instagram, Annie Sloan and I had a wonderful short conversation about them.
Bahia contacted me a few weeks ago and asked that I design and paint two pieces exclusively using Annie Sloan Chalk paint and wax. I had used her paint in the past on many pieces but never on my modern furniture. I was up for the challenge and appreciated the opportunity! Thanks Bahia!
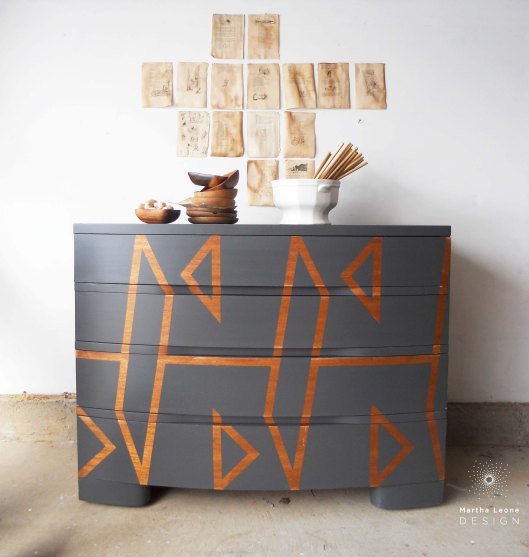
DECONSTRUCTED LETTERFORMS
I’m exploring the deconstruction of letterforms on a 3:4 grid, the letters V and Y are merged and placed in an asymmetrical layout on the front of this mid century dresser. Mid century pieces make for wonderful canvases for this type of design.
Take a look at my other dresser in this series.


ART DECO DRESSER / EMPIRE STATE BUILDING
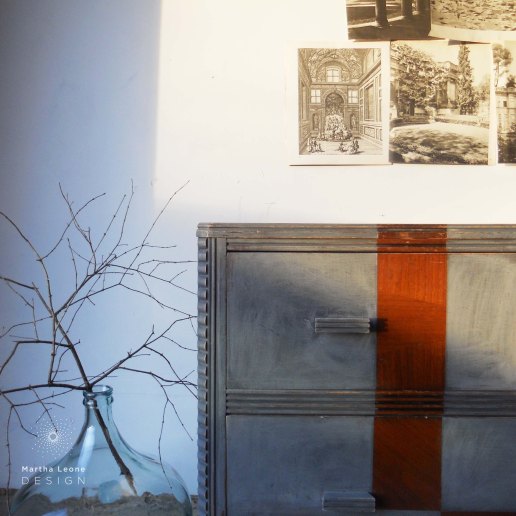
This piece was originally designed in the late 1930’s during the art deco period in history where rich color and bold geometric shapes adorned much of the buildings. Using history to guide my design, I created a shape that was inspired by the iconic Empire State Building and wrapped it from top to front on this dresser.


PROCESS
Mid Century Dresser: With Annie Sloan paint, I use her brushes. But, to get the desired look on the mid century piece, I revised my process by thinning down the paint a bit and by using a 6″ foam roller instead of the brush. The end result was a smooth brushless finish. No sanding was needed.
Art Deco Dresser: I wanted this piece to look more textural than the other so I used Annie Sloan’s flat brush and painted in loose strokes. Distressing also helped achieve the desired texture.
THOUGHTS ON WAX
The next three photos show what the Art Deco dresser looked like after painting and sanding but BEFORE wax had been applied. You can see how dramatically the color shifts to a beautiful deep shade AFTER wax has been applied and buffed. I love the texture in the pre-waxed photos and have been looking into ways of maintaining this texture even after wax has been put on. On my Constellation Dresser, I used low grit sandpaper to scratch the surface and used a toothbrush to flick small specs of plaster on the surface. Those have worked but I am still looking for new ideas to get this look. Annie suggested that I wax but not buff. I’ll try that and also try dry brushing varying shades of Graphite/Pure White mixes.

HOW TO APPLY ANNIE SLOAN CLEAR WAX
A step by step with Bahia, On The Purple Couch
After your piece has dried completely, the next step is up to you. If you want to sand the paint to a distressed or smooth finish, you have two options: 1. Wax first, then sand, then apply final coat of wax. This cuts down on the dust and allows more control over how much paint comes off while sanding. 2. Or, sand first, then wax.
The directions below assume the piece has been sanded first.
These two pieces are available at On The Purple Couch! 301-896-0011. http://www.onthepurplecouch.com. Or, you can purchase them through my etsy shop.
Follow me on Instagram as I share more pictures of how I paint and prep my furniture and get sneak peeks of my approach to styling these pieces for photoshoots.


21 Saturday Mar 2015
Posted in • Classic Style, Before and After
Good morning all! It’s not every day that I write two posts in one morning! Today is different because I wanted to make you aware of a design contest going on right now hosted by General Finishes.
If you think the two pieces I entered warrant your vote, please vote for them by clicking on each image. You’ll be taken to the entry page where you can cast your vote! Thanks so much to my loyal followers of this blog.
Category: Best mix of General Finishes Milk Paint colors
This is a custom mix of Klein Blue and Lamp Black. Top was sanded then stained with GF Gel Stain. Sealed with High Performance Top Coat in flat.

Category: Best use of multiple products
I used General Finishes Milk Paint in Queenstown Gray, Frog Tape, and sealed it with General Finishes High Performance Top Coat in flat.

If you haven’t yet tried General Finishes Milk paint, I would highly recommend it! It adheres to almost any surface without sanding and prep and is super smooth. To achieve a smooth finished look, I applied the paint with a brush in some areas and used a 6″ foam roller for the flat areas. The top coat was painted on and dried to a smooth finish.
General Finishes Milk Paint Colors

Follow me on Instagram as I share more pictures of how I paint and prep my furniture and get sneak peeks of my approach to styling these pieces for photoshoots.

21 Saturday Mar 2015
Posted in • Classic Style
Tags
Benjamin Moore paint, french dresser, french provencal dresser, french provencal painted furniture

These past few weeks have been full of new opportunities and lots of custom work. I attended The Makers Summit two weeks ago and came away full of ideas for the growth of my business from amazing people like Jodi Levine of Super Make It and author of Candy Aisle Crafts and Rachel Faucett of Handmade Charlotte. One of the highlights was a super talk on the topic on productivity from Eric Dodds/The Iron Yard. He is developing a series of blog posts with the content from this talk. I highly recommend it.
On to furniture… So thankful to be able to do custom work for my customers! All of these pieces were done in Benjamin Moore Aura paint. The bold color and contemporary design were chosen by my customers!


Note: When I paint with Benjamin Moore or other latex paints, sealing isn’t absolutely necessary. However, because this is a custom piece, I apply the sealer for extra protection.
For a more detailed list of resource I use, check out this post. It’s my exhaustive list of resources for my mid century pieces but also applies to these french pieces.
Follow me on Instagram as I share more pictures of how I paint and prep my furniture and get sneak peeks of my approach to styling these pieces for photoshoots.

16 Monday Mar 2015
These past few weeks have been full of new opportunities and lots of custom work. I attended The Makers Summit last weekend and came away with ideas for the growth of my business from amazing people like Jodi Levine of Super Make It and author of Candy Aisle Crafts and Rachel Faucett of Handmade Charlotte. One of the highlights was a super talk on the topic on productivity from Eric Dodds/The Iron Yard. He is developing a series of blog posts with the content from this talk. I highly recommend it.
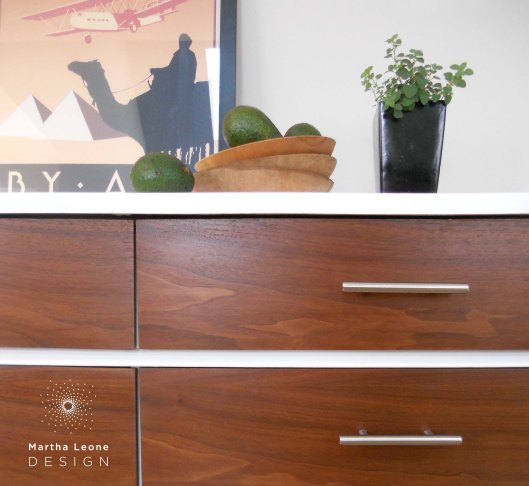
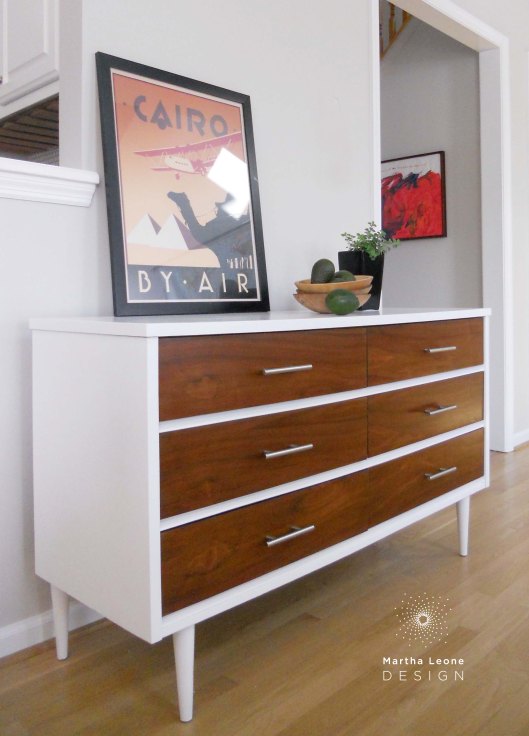
Mid century custom pieces have become a staple of my business. I have detailed my process and materials list in two posts. This latest piece was done for a young girl with lots of sophisticated style since a clean slick mid century piece was exactly what her redecorated bedroom needed!


Follow me on Instagram as I share more pictures of how I paint and prep my furniture and get sneak peeks of my approach to styling these pieces for photoshoots.

26 Thursday Feb 2015
Posted in • Mid Century / Contemporary Style, Before and After, Tips
Tags
Benjamin Moore paint, General Finishes Gel Stain, general finishes milk paint, Howard Paste Wax, Minwax Stain, RIDGID orbital sander, Varathane Clear Polyurethane, Zinsser primer


Basic Witz sideboard in Benjamin Moore Aura Super White. Wood has been sanded then sealed with Varathane Polyurethane in Satin.


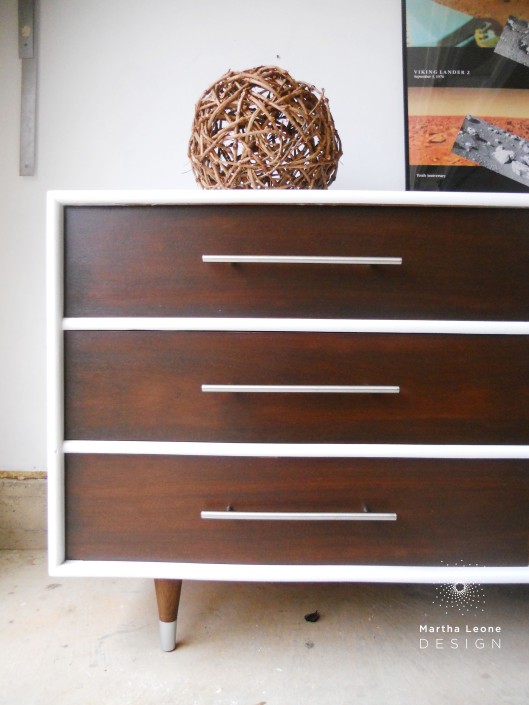
Mid century dresser painted in Benjamin Moore Aura Super White and sealed with Howard Citrus Shield Premium Paste Wax. Wood has been sanded then stained with Minwax Dark Walnut Stain then sealed with Varathane Polyurethane in Satin.

Today I’m sharing two recently finished mid century pieces. These types of pieces have become the bread and butter of my business. After much trial (and some error), I have found the products in this post to produce the best results on mid century pieces. A detailed description of how I paint mid century furniture can be found here.
P A I N T


I use various brands of paint but for mid century pieces that require a brushless finish, I use Benjamin Moore Aura in Satin, Benjamin Moore Advance in Satin, or General Finishes Milk Paint. These are high quality paints that dry to a hard finish.
• Benjamin Moore Aura and Advance paints are my favorites. Advance is a hybrid paint (water based but acts like an oil) and has great self-leveling qualities if a brush is used to apply the paint. However, it requires 15 hours of dry time between costs and sometimes I don’t have the time for that. In those cases, I use Aura.
• General Finishes Milk Paint is very easy to use and without much effort it will produce a very smooth finish.
R O L L E R S // B R U S H E S

In my opinion, these 6″ foam rollers are the best rollers on the market. I buy them at Home Depot and always have them on hand. I also use Benjamin Moore brushes designed for application of latex paint. Any high quality brush will work… just make sure the brush is designed for latex application if you’re working with water based paints.
S A N D E R

This RIDGID 5 in. Random Orbit Sander works wonders. I use it when I need to sand down to the raw wood. I start with 80 grit and work my way up to 150 and higher. The variable speed control allows me to sand with care, especially when working with the thin veneers on mid century pieces.
P R I M E R

Mid century pieces are always primed. I have used many primers over the years and have settled on Zinsser Cover Stain Oil Base Primer which dries in about two hours. The primer is always applied with a roller.
S T A I N
When I want to restain a mid century piece, I always sand down to the raw veneer. That can be tricky though as lots of those beautiful veneers are super thin. In this case, I usually use Minwax Wood Finish (oil-based stains). I prefer the oil based stains over the water-based stains because they produce a richer color.

When I’m doubtful that a veneer can withstand sanding down to the raw, I scuff it up with sandpaper then use General Finishes Gel Stains. I apply all stains with either a staining pad or Scott Shop Towels.


S E A L E R
Most high quality latex paints do not need to be sealed. However, I always use these products to provide an extra coat of protection:
For painted surfaces other than white: I use Minwax Wipe-On Poly. It’s easy to use and doesn’t leave brush marks behind. For the smoothest (and lint free) finish, I’ve found that it’s very important to apply this poly with a staining pad.


For painted white surfaces: Howard Citrus Shield Premium Paste Wax is my favorite wax although there are many others on the market. This particular product is easy to apply and buff to a smooth finish. I use white rags to apply and buff.

For stained or raw wood surfaces: I use many different products. Here’s my short list:
1. Varathane Water Based Polyurethane: For a beautiful velvety finish on all of my mid century woods, I apply it with a black brush to produce a perfect brushless finish. The brush can be found with the polyurethanes at Home Depot or Lowes.

2. General Finishes Top Coats: For a very durable finish, General Finishes Arm-Seal (oil based) is a great choice. Or General Finishes High Performance (water based) top coat also works wonders. Both of these products are easy to apply they produce beautiful brushless finishes. I use a foam brush to apply (they are designed to also be applied with a rag but that hasn’t worked well for me).


3. I’ve been experimenting with a home made version of wipe-on poly. It’s super easy to mix but the technique involves several layers of poly with sanding in between each layer. The end result is the most beautiful velvety finish and is worth the effort! I’ll write about this in a future post but if you’re interested now, contact me.
The products highlighted in this post are based on my personal research and experience. I’ve been careful to refer to the products’ exact names and have provided pictures but no links to where they can be purchased. Most of these products can be purchased a local hardware store. Others can be found online.
Do you have a favorite product for your mid century pieces? Let me know!
Follow me on Instagram as I share more pictures of how I paint and prep my furniture and get sneak peeks of my approach to styling these pieces for photoshoots.

11 Wednesday Feb 2015
Posted in • Classic Style, Before and After
 Oh my goodness people. I’ve been trying to weather these seriously cold days in the workshop (garage) while painting and prepping. It’s been difficult. I’m sure I’m not alone. All of my painting friends have probably been doing the same. My little space heater isn’t helping.
Other than working on custom orders and finishing two pieces (Gray Dresser, Deconstructed W Dresser) for Peg Leg Vintage, I’ve been shopping like crazy trying to fill the recently rented storage unit with vintage finds for those warmer days of spring. Last week, I found this piece at the Goodwill and knew that it needed a bold color. For a piece like this, I prefer to use one bold color rather than complicate the look with multiple colors or distressing. It’s a large piece that demands attention, so I painted it a color that would allow it to scream rather than whisper its way into a room.


A few of my recent finds:


Recently, I spent some time refining the blog and thinking on future growth of the business. Here are a couple of ideas to consider for those cold days:
1. Refine the accounting of incoming and outgoing funds for your business. Christina with Phoenix Restoration has written several great posts about growing a furniture business and has offered a free excel spreadsheet that helps track your expenses for tax time.
2. Shop. Shop. Shop. Gear up for a busy spring by spending extra time shopping for vintage finds.
3. Attend a conference! I’m headed to The Makers Summit in Greenville, SC in early March.
How has your business weathered these cold days?
Follow me on Instagram as I share more pictures of how I paint and prep my furniture and get sneak peeks of my approach to styling these pieces for photoshoots.
Linking up: Miss Mustard Seed • House of Hipsters • VMG206 • Just a Girl and Her Blog

03 Tuesday Feb 2015
Posted in • Furniture as Art, Before and After, The Creative Process
Tags


On a perfect day, design is easy, effective and beautiful. I wasn’t having a perfect day when I worked on this dresser. I knew what I wanted to accomplish but the idea went through at least four revisions before the paint brush was picked up.
D E S I G N P R O C E S S
After finishing the piece below, I thought it would be fun to use the shape to create a pattern for another dresser. Take a look at the evolution of this design:

1
The shape is rotated 180 degrees and copied till some of the lines intersect various corners.
2
The design is masked off.

3
The design feels a bit disjointed so the strong diagonal lines are extended to
close up some of the open spaces.

4
Still not working well but I wasn’t ready to scrap the whole idea. So I deleted the strong diagonal lines and connected other lines. Recognizable shapes began
to emerge.

5
Oh my goodness. Bad move. So I took a few lines away and added others.
Then took a few more away before painting.

6
Finished.

Painted in Queenstown Gray by General Finishes and sealed with their topcoat in Flat.
This dresser is available at Peg Leg Vintage.
Follow me on Instagram as I share more pictures of how I paint and prep my furniture and get sneak peeks of my approach to styling these pieces for photoshoots.

26 Monday Jan 2015
Posted in • Furniture as Art, The Creative Process


D E S I G N P R O C E S S
I’ve been exploring letterforms and have been sketching on graph paper which is not the usual sort of paper I use. It helped me to conform this design to the proportions of this dresser. The letter W is in view here although it might not be obvious, mainly because of the horizontal line that connects the left and right vertical lines. That line seemed necessary to tie the design together.


P A I N T P R O C E S S
After doing the typical prep of rough sanding and cleaning, I used a dry brush technique to brush the white paint on in the areas that would be masked off. Then, using a ruler, I drew the deconstructed W, masked it off with Frog Tape then proceed to paint two coats of Ralph Lauren Metallic Paint in Graphite. It was sealed using a staining pad and Minwax Wipe-On Polyurethane.

This dresser will be available this week at Peg Leg Vintage.
Follow me on Instagram as I share more pictures of how I paint and prep my furniture and get sneak peeks of my approach to styling these pieces for photoshoots.

16 Friday Jan 2015
Posted in • Furniture as Art, The Creative Process


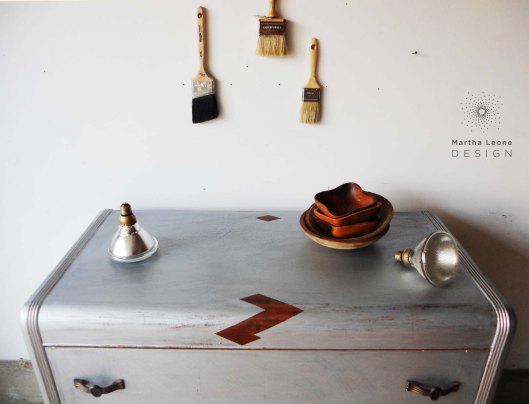

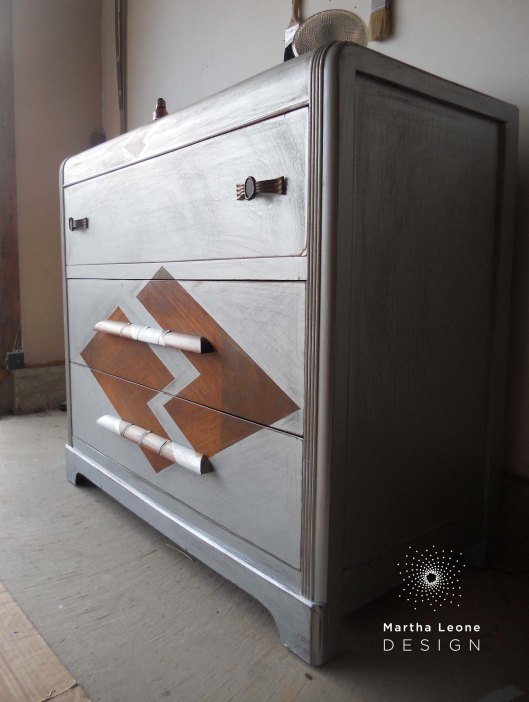


Waterfall dressers aren’t my favorites although I don’t hesitate to buy them. That’s because their flat drawer fronts provide a welcoming surface for my ideas. Their “waterfall” curve at the top also inspires me to allow my ideas to fall from the top down the front of the dresser. Some of my other waterfalls (click each image be taken to a blog post):


The current silver dresser was taped off with Frog Tape then painted two coats of Martha Stewart Silver. After the tape was removed, the dresser lacked interest so I scratched the surface with 60 grit sand paper to achieve a finish that resembles worn out stainless steel. I’ve done this sort of scratching with sand paper on another piece.
The design came from a sketch I did almost two years ago and I think it works well as its angles follow the angles in the inlaid wood. If you keep a sketchbook, take a look back at old ideas… you might find one worth pursuing! If you don’t keep a sketchbook, consider starting one this weekend!
It’s available in my etsy shop.
Follow me on Instagram as I share more pictures of how I paint and prep my furniture and get sneak peeks of my approach to styling these pieces for photoshoots.
Linking up:
Bre Purposed/Your Designs This Time • Finding Silver Pennies • The Big Reveal/Found and Foraged • The Interior Frugalista • Mod Vintage Life • Miss Mustard Seed • Just a Girl and Her Blog

